Showing posts with label maker. Show all posts
Showing posts with label maker. Show all posts
Saturday, October 6, 2012

Building a batbox for the zoo
I volunteer at the Brandywine Zoo and I was asked to build a batbox for an Earth Day project. I never got around to writing a blog entry for it.
After a great deal of research, I designed a small bachelor batbox for display. This is probably the smallest batbox you can build with any hope to have it lived in.
Easy 2’ x 2’ x ½” exterior grade (not pressure treated) plywood bat box cutting diagram.

Here's the layout on a 2' x 2' sheet of untreated plywood


Marking grooves on the inside back of the box. These are for the bats to hold on to.

Cutting the grooves in to the board. I set the saw to less than 1/4". Cutting straight lines was NOT easy. The bats won't care and they are on the inside of the box where they can't be seen.

Edge on view of the grooves.

Applying caulk to hold the side spacers. The longer ones go down first. The shorter ones get caulked on top of the longer ones.


I then attached the roof using caulk and the same finishing nails I used to attach the front and back.

After a great deal of research, I designed a small bachelor batbox for display. This is probably the smallest batbox you can build with any hope to have it lived in.
Putting up a bat roosting box can help replace lost or degraded habitat that has been contributing to the decline of bat populations throughout North America.
Bat boxes located near a permanent source of water, especially a marsh, lake or river, are the most likely to attract bats. Bat houses should be hung roughly twelve to fifteen feet above the ground, sheltered as much as possible from the wind. Don't be discouraged if conditions for your bat house are not perfect. Even natural roosts are seldom ideal.
Bats sometimes move into newly erected bat boxes within hours, but more often, bats may not take up residence for as much as one to two years. If your bat box is not occupied by the end of the second year, try moving it to a warmer or cooler location. One trick recommended is to acquire bat guano and treat the landing area of the box with it to mask the unnatural odors from construction (paint, caulk, the wood itself).
Bat boxes located near a permanent source of water, especially a marsh, lake or river, are the most likely to attract bats. Bat houses should be hung roughly twelve to fifteen feet above the ground, sheltered as much as possible from the wind. Don't be discouraged if conditions for your bat house are not perfect. Even natural roosts are seldom ideal.
Bats sometimes move into newly erected bat boxes within hours, but more often, bats may not take up residence for as much as one to two years. If your bat box is not occupied by the end of the second year, try moving it to a warmer or cooler location. One trick recommended is to acquire bat guano and treat the landing area of the box with it to mask the unnatural odors from construction (paint, caulk, the wood itself).
Design
Outside dimensions of boxes should be about 1.5 feet tall and at least 12 inches wide with a 3-6”is landing area.
Roost partitions should be ¾” to 1”.
Ventilation slots should be ¼” to ½”
Construction
Half inch exterior grade plywood is best for fronts, backs and roofs, and roosting partitions.
1” board lumber is best for sides.
Prior to painting all seams should be caulked with latex caulk that remains flexible over time.
Paint exterior surfaces with two coats of exterior latex paint (dark brown, dark gray or dark green is best for Mid-Atlantic states).
Sun Exposure
Boxes should receive at least 6-7 hours of direct sun and be oriented southeast or southwest.
Easy 2’ x 2’ x ½” exterior grade (not pressure treated) plywood bat box cutting diagram.

Here's the layout on a 2' x 2' sheet of untreated plywood

Some detail of the measurements.

Marking grooves on the inside back of the box. These are for the bats to hold on to.

Cutting the grooves in to the board. I set the saw to less than 1/4". Cutting straight lines was NOT easy. The bats won't care and they are on the inside of the box where they can't be seen.

Edge on view of the grooves.

Applying caulk to hold the side spacers. The longer ones go down first. The shorter ones get caulked on top of the longer ones.

After stacking the front on top of the shorter strips, on top of the longer strips, on top of the back, nail the layers together from both front and back, with caulk in between each of the layers. After the caulk dries, Bevel the edge on a belt sander, planer or with a circular saw set to a 45 Degree angle.

I then attached the roof using caulk and the same finishing nails I used to attach the front and back.

Sunday, August 5, 2012
Maddie makes a pillow
Maddie used the sewing machine for the first time. She made a pillow. We bought a fat quarter at Jo-Ann fabric. Maddie and I folded it in half and pinned it around the edge. I marked a spot for her to stop sewing.
I helped her turn the corners, but she was a champ with the sewing machine!
She did most of the stitching herself. I knotted it off at the end.

A VERY proud little maker.

I helped her turn the corners, but she was a champ with the sewing machine!
She did most of the stitching herself. I knotted it off at the end.

A VERY proud little maker.

Friday, June 8, 2012
Thermostat and spark plug replacement
The 2003 Saturn Vue was designed by a team of people with a sadistic streak. If I ever get a time machine, the first thing I will do is go back to when they were designing this engine and walk into their office and smack every single one of them in the back of the head as hard as I can while shouting, "WHAT ARE YOU THINKING!!!"
To start I removed this air baffle thing.

The next thing I have to remove (now remember, I'm changing sparkplugs and a thermostat, not a piston.) is the upper intake manifold.
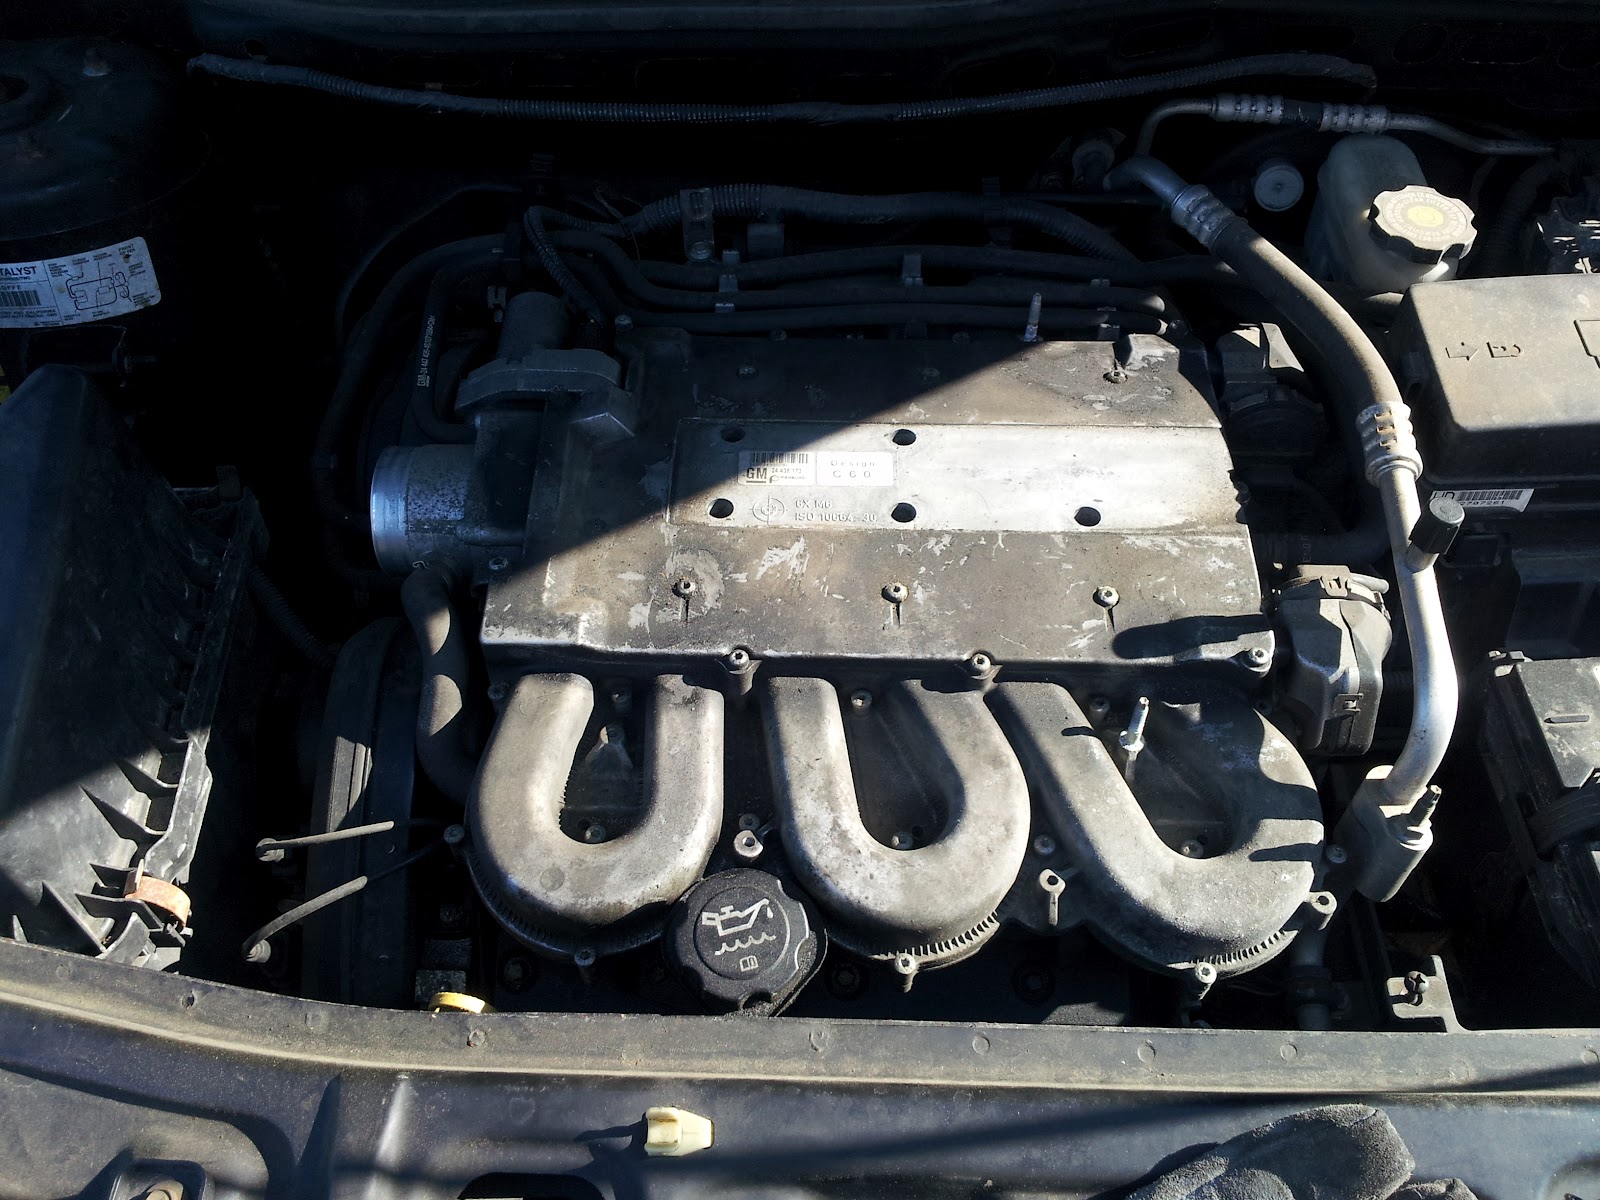
There are 5 bolts holding on the upper intake manifold. These bolts are recessed 6 1/2 inches into the manifold. Yes, 6 1/2 inches.

Once that is "out of the way," a project that requires the removal of 11 electrical plugs, the gas line (which requires a special tool, so I figured out a way to NOT remove it) and at least another 14 bolts, you get this view of the corner of the lower intake manifold sitting on top of the thermostat. Oh, did I mention, nowhere did it say that the lover manifold needed removal.

At this point I gave up in disgust and switched to just changing the spark plugs. You see that way, way, way down there? That's the spark plug.

There are two wrenches in this picture. The puny one with the 6 inch extension I used to remove the upper intake manifold and the BIG one with over 14 inches of extension I needed to reach down and get to the spark plugs.

This is the upper intake manifold being held out of the way while I remove and replace the rear set of spark plugs entirely by feel. Also I don't have a picture of the lower intake manifold, because my camera doesn't work in the deep, dark recesses of hell.

After removing the lower intake manifold (and knocking a bunch of debris into the recess where the valves are (whatever the hell you call that)) I brought it inside and scrubbed away the build up of gunk. I was also quite glad the you could only get a gasket kit with all of the gaskets, (top and bottom) for the lower intake manifold. I removed and replaced them all.

FINALLY, after bring the shop-vac out and vacuuming the debris out of the nooks and crannies of the engine, I got the thermostat out of the car. only to find it was different. Now I wanted to go and smack someone at Rock Auto in the back of the head.

But, being The Maker and Fixer of Things, I was not going to be stopped by something as simple as not enough metal on the thermostat. I went rooting around in the back of the car and found a bunch of washers and a nut that was the right size and thread for the bolt to act as a gap filler. Yes, all of the bits that I used were in the car. I know, I know, creepy!

FINISHED! Time for a beer!

I won't bother you with the drama of the reassembly of the engine. As usual, I had labelled everything as it came out and it all went back in without trouble. Total elapsed time a little over 8 hours.
After scrubbing several times, my hands were still looking like they belonged to a character from a Tim Burton movie!

Saturday, January 7, 2012
Been a while!
Just because I haven't been posting, doesn't mean I having been Making, fixing, building or creating. I've just been lazy about updating. I will try to do better!
It's January, so I won't be brewing much. I'll start up again in full swing in March. My goal is 25 batches again this year. I missed that goal last year. I only got to batch 23.
Projects on deck are:
- Camera interval timer (arduino)
- Curtains for the Dining room and the kids rooms.
- Finishing building my new Ubuntu main computer.
It's not all glamorous, but it's all making!
Friday, March 11, 2011
Coming next to my kitchen, Low budget Sous-vide
Time to get back into the micro controller world. I plan on blending micro-controllers with temperature sensors, heaters and pumps to COOK!
Sous-vide
French for under vacuum. The process basically consists of vacuum packing food in a plastic bag and immersing it in water bath at a constant temperature (typically the temperature of the food when it's considered "done") for a long enough period of time to let it reach that heat all the way through and kill any possible pathogens in the food.
Most food, when cooked sous-vide requires "finishing" or a quick trip into the frying pan or under the broiler to give it the appearance of having been cooked by that method.
Two of the biggest benefits of sous-vide are that the food is extremely moist since all of the moisture is trapped in the bag with the food and the food can rest at the "done" temperature for many hours without becoming overdone, allowing for wide flexibility in serving times.
There will be much more to come on this topic.
Saturday, March 5, 2011
Time to make the Doughnuts

Something I've always wanted to try is to making doughnuts. I've been making a lot of interesting baked goods lately, so Why Not?
They're not exactly "baked" but the dough is not far from bread dough.
The Ingredients
2 (.25 ounce) envelopes active dry yeast
1/4 cup warm water (105 to 115 degrees)
1 1/2 cups lukewarm milk
1/2 cup white sugar
1 teaspoon salt
2 eggs
1/3 cup shortening (63 grams)
5 cups all-purpose flour
1 quart vegetable oil for frying
1/3 cup butter
2 cups confectioners' sugar
1 1/2 teaspoons vanilla
4 tablespoons hot water or as needed
The Process
- Sprinkle the yeast over the warm water, and let stand for 5 minutes, or until foamy.
- In a large bowl, mix together the yeast mixture, milk, sugar, salt, eggs, shortening, and 2 cups of the flour. Mix for a few minutes at low speed, or stirring with a wooden spoon. Beat in remaining flour 1/2 cup at a time, until the dough no longer sticks to the bowl. Knead for about 5 minutes, or until smooth and elastic. Place the dough into a greased bowl, and cover. Set in a warm place to rise until double.
- Turn the dough out onto a floured surface, and gently roll out to 1/2 inch thickness. Cut with a floured doughnut cutter. Let doughnuts sit out to rise again until double. Cover loosely with a cloth.
- Melt butter in a saucepan over medium heat. Stir in confectioners' sugar and vanilla until smooth. Remove from heat, and stir in hot water one tablespoon at a time until the icing is somewhat thin, but not watery. Set aside.
- Heat oil in a deep-fryer or large heavy skillet to 350 degrees F. Slide doughnuts into the hot oil using a wide spatula. Turn doughnuts over as they rise to the surface. Fry doughnuts on each side until golden brown. Remove from hot oil, to drain on a wire rack. Dip doughnuts into the glaze while still hot, and set onto wire racks to drain off excess. Keep a cookie sheet or tray under racks for easier clean up.
I made the dough last night. After a 2 hour rise, I punched it down and put it in the fridge. This morning it had risen tremendously. (Yikes!)
Mason and I rolled out the dough and Maddie cut out the doughnuts.
Rise!

Boiling in 350F oil:

Enjoy!

Sunday, February 27, 2011
Maddie made a hat.
After I made a hat for Mason, Maddie decided that she needed to make a hat of her own. She worked diligently for hours and burned through an entire roll of tape, but the results were cute. It looks a bit like a chef's hat and has a butterfly on the front.


Saturday, February 26, 2011
A "Cat in the Hat" hat for Dr. Suess' birthday
Making a hat


My son's school is celebrating Dr. Suess' 107th birthday on Monday. The parents were asked to make something Suessian for the kids to wear to school. Being an over-achiever I decided to make a red and white striped hat. This is actually not the first hat I've made, but I am amazed at how well it came out.

It started with 3 pieces of red felt and 4 pieces of white. I edged stitched along the short side two pieces of red and two pieces of white for the stripes. Mason's head is 20 1/2" around so I needed 21 1/2" with seam allowances. I also edge stitched two pieces of white along the long edge to use for the brim.
Edge stitching:


I cut two 3" x 21 1/2" strips of white felt and 1 of red felt. The other red felt strip was more of a art than measurement. I sewed them wrong sides out and then flipped them over and satin stitched them from the outside. This was mostly to give the hat a little structural integrity, but it also looks good.
Satin stitching:

I didn't get a picture of the top red strip and I wish I had. It was 21 1/2" across the bottom, 24" across the top, 3" tall at the center and 4 1/2" tall at each end.
After stitching that together, I sewed the opposite seam of the hat making it a tube. I flipped it over and shaped the top edge the way I wanted it and traced and cut a piece for the top.
Top piece:


I sewed the top and the brim on (sorry, no pictures) and then trimmed the brim, freehand, flipped it over and sewed a bead around the edge of the brim.
Finished hat:


Monday, February 21, 2011
First batch of the year
I just brewed my first batch of the year. It's another round of Farmhouse Ale. I'm not kidding when I say I love this beer!
Saturday, February 12, 2011
Making a maker.
Making my daughter into a maker.
Maddie wanted to do something special for her class for Valentine's day. I suggested making candies. Just pouring chocolate into molds was a little mundane for me. After all, with a moniker like "Maker and Fixer of Things," I had to go the extra mile. I knew we'd be make something cool, but what I didn't expect was to make a maker.
We started with a lump of scrap polymer clay and a foam heart as a guide.


Then I helped her a little to add an embellishment she made.

The finished form, after baking. I had to add a little clay to the bottom to flare it out so that when we made molds the finished candies would be easy to unmold.

Next the original art went onto the vacu-former and we pulled four molds by heating plastic from gallon water jugs until they were nearly transparent and then placing them over the vacu-former and Maddie turned on the vacuum. It takes less than a second to suck the air out, cool and harden the mold.


I melted some white (pink and red) chocolate Witman's candy melts and let Maddie fill the molds.


The first batch and the rest! Now we just need to wrap them in foil.


A red heart still in the mold.

She was so excited to make something from scratch that she can share with her friends. I was very happy to see the excitement and energy in her eyes. So of course, Mason had to get in on the action too. :-)


Subscribe to:
Posts (Atom)